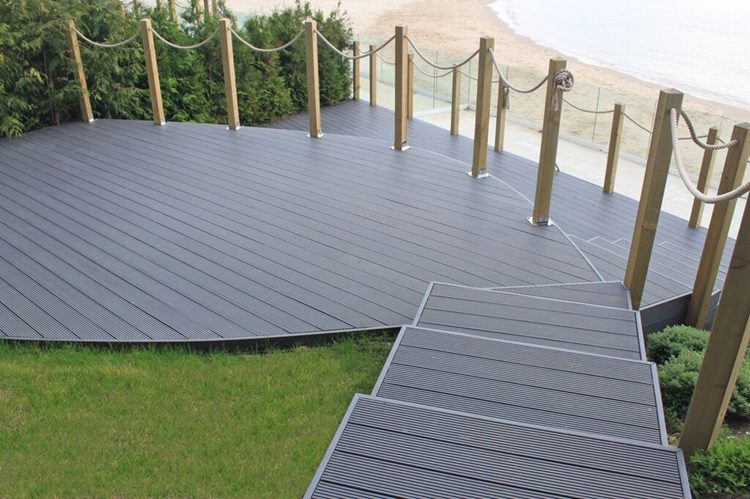
Fancy getting creative with curved composite decking?
If you’re looking to get creative with your composite decking, perhaps you should consider a curved deck? Despite the seemingly rigid nature of composite wood, you can use composite deck boards and fascia to create a variety of beautifully curved designs.
Why used curved composite decking?
There are a few reasons you may choose a curved deck for your outdoor space. Firstly, design. A curved decked area allows you to break away from traditional designs and introduce a stylish, eye-catching focal point for your garden. Unlike the straight lines of conventional decks, curved designs soften the visual impact and can seamlessly integrate with the surrounding landscape.
Secondly, space. You may be limited on space or have an unusually shaped outdoor area. When this is the case, a curved decking offers much more flexibility to make better use of the space available to you, whilst still looking stunning.
How to build a curved decking subframe
1. Lay the joists
Firstly, you need to lay the joists for your substructure. It is advised to measure the inside curve of your new deck and ensure your joists are placed at regular enough intervals to hold the fascia in the curve. This should be a maximum of 450mm apart.
2. Cut the curve
You can now cut the joists to the desired curved shape using a circular saw.
3. Brace
Finally, you need to infill the gaps between the joists with a ‘bracing’ material to give the fascia board a solid base on which to affix to. Remember to cut the ends of the infills at an angle to follow the curve.

How to install curved composite decking
1. Installation
You can now install your composite decking boards, remembering to follow the manufacturer’s instructions.
2. Create the curve
Using a circular saw, you can cut a curve into your deck boards, following the curve you have created in the subframe.
3. Add a fascia board
To create a smooth outer curve you next need to install a suitable fascia board.
Firstly, you need to select the correct board – and our 19mm fascia board is the perfect choice. It’s both thin and flexible enough to curve around a shallow curve, using our specialised stainless-steel screws to keep it in place.
To install the fascia, gently bend the board to the shape of the curve, predrilling and fixing two screws every 200mm – our coloured stainless-steel screws are ideal. Where facia boards meet end on end, a gap of 5mm should be accommodated to allow for expansion.
You should now have a completed curved composite deck ready to enjoy!
Curved composite decking ideas for your outdoor space
Curved composite decking offers a chance to create a truly unique outdoor space and it can be used in myriad ways. Here are just a few of our favourites which will hopefully inspire you to get more creative with curves:
- An eye-catching standalone circular deck in the centre of your garden.
- Curved decked steps leading from your home to your outside space.
- A curved deck surrounding a pond or raised area.
- A curved composite decked walkway meandering through your garden.
- A raised curved bench around a curved deck area on which to relax and enjoy your garden.
For further information about how to install a curved deck or on composite decking in general, call our expert team today on 01978 667 840 or email enquiries@ecodek.co.uk for a no-obligation chat.